
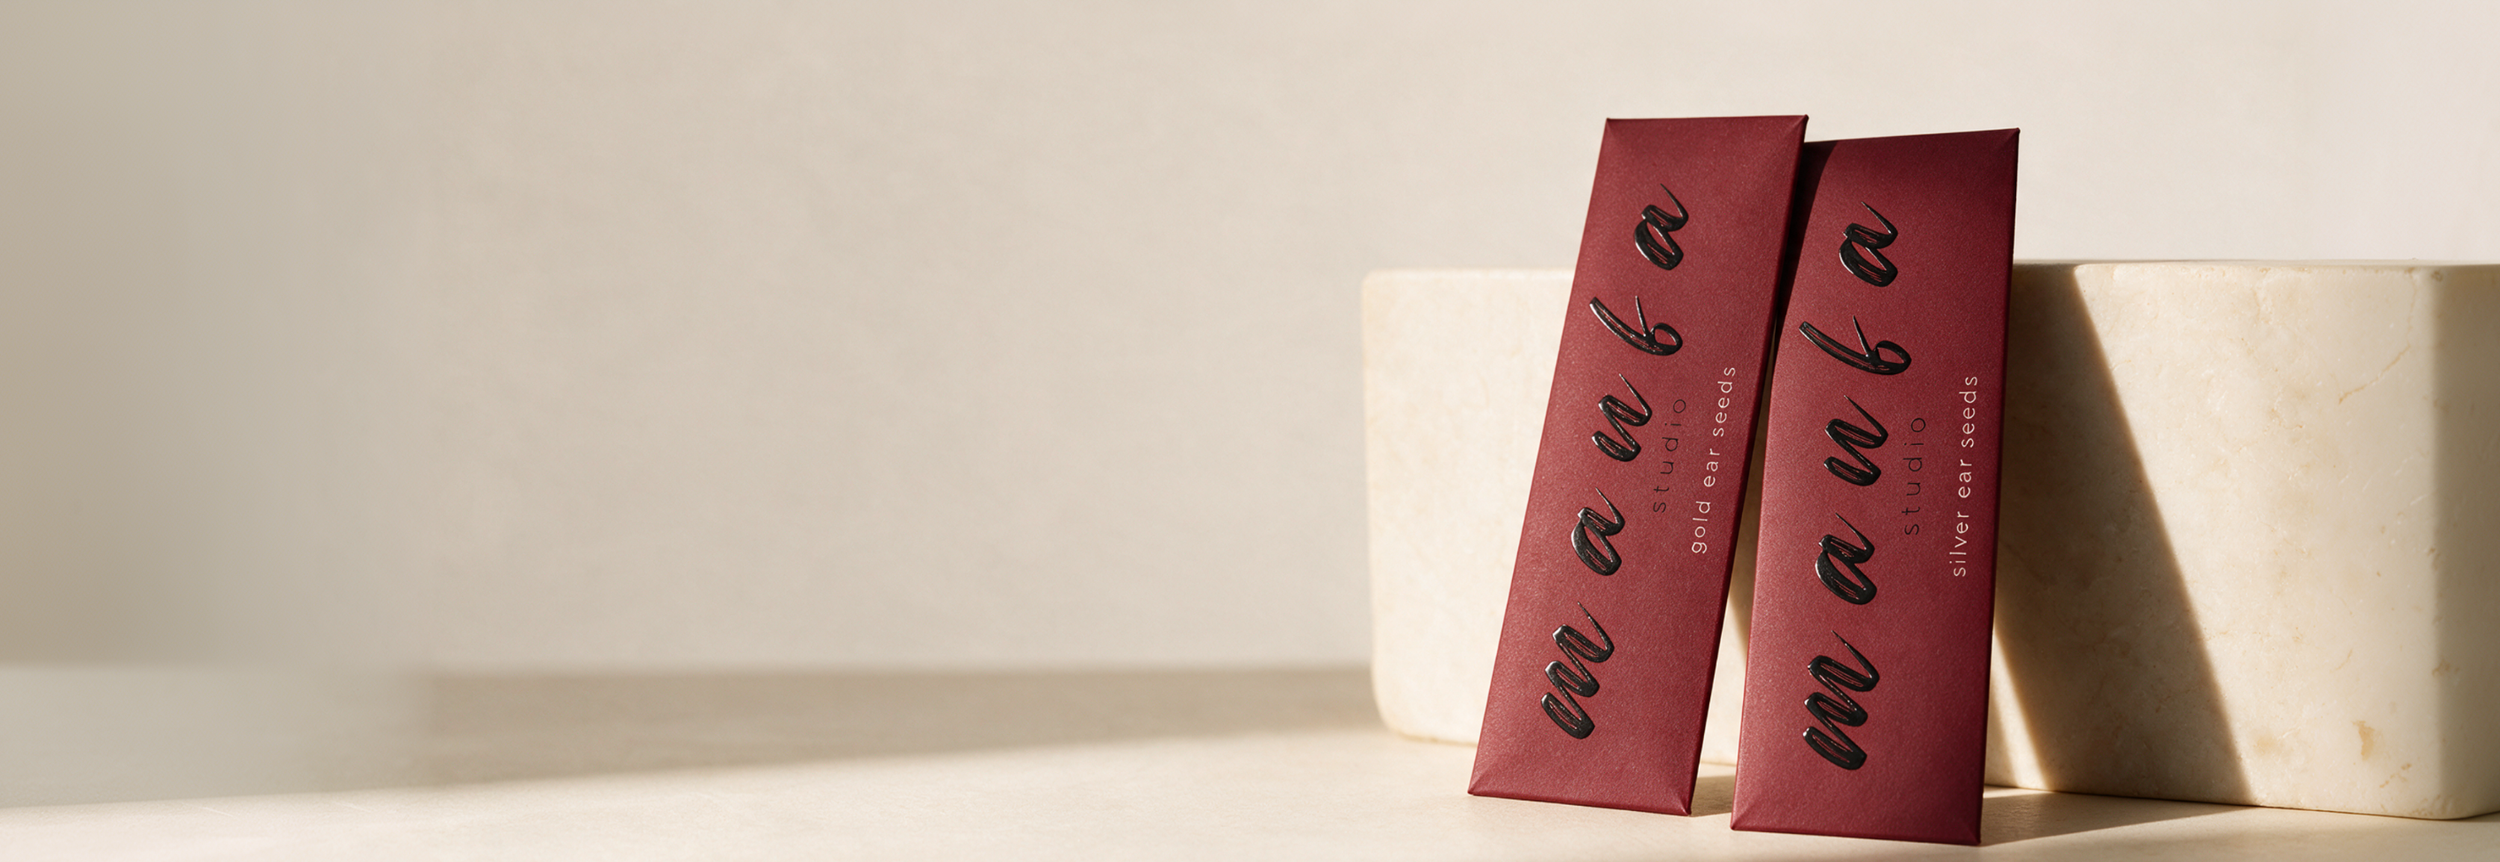
THE MANFA GUIDE
Your ritual starts here.
Your guide to applying, wearing and caring for your Manfa ear seeds.
The Artisans Behind the Curtain

Principal Designer
We count on Maya to orchestrate form and function; her portfolio spans boutique hotels and heritage estates.

Operations Conductor
Jon keeps our processes flowing with quiet rigor, ensuring every engagement unfolds seamlessly.

Client Strategist
Leah cultivates relationships with disarming grace, aligning discerning clients with bespoke solutions.
Before you apply
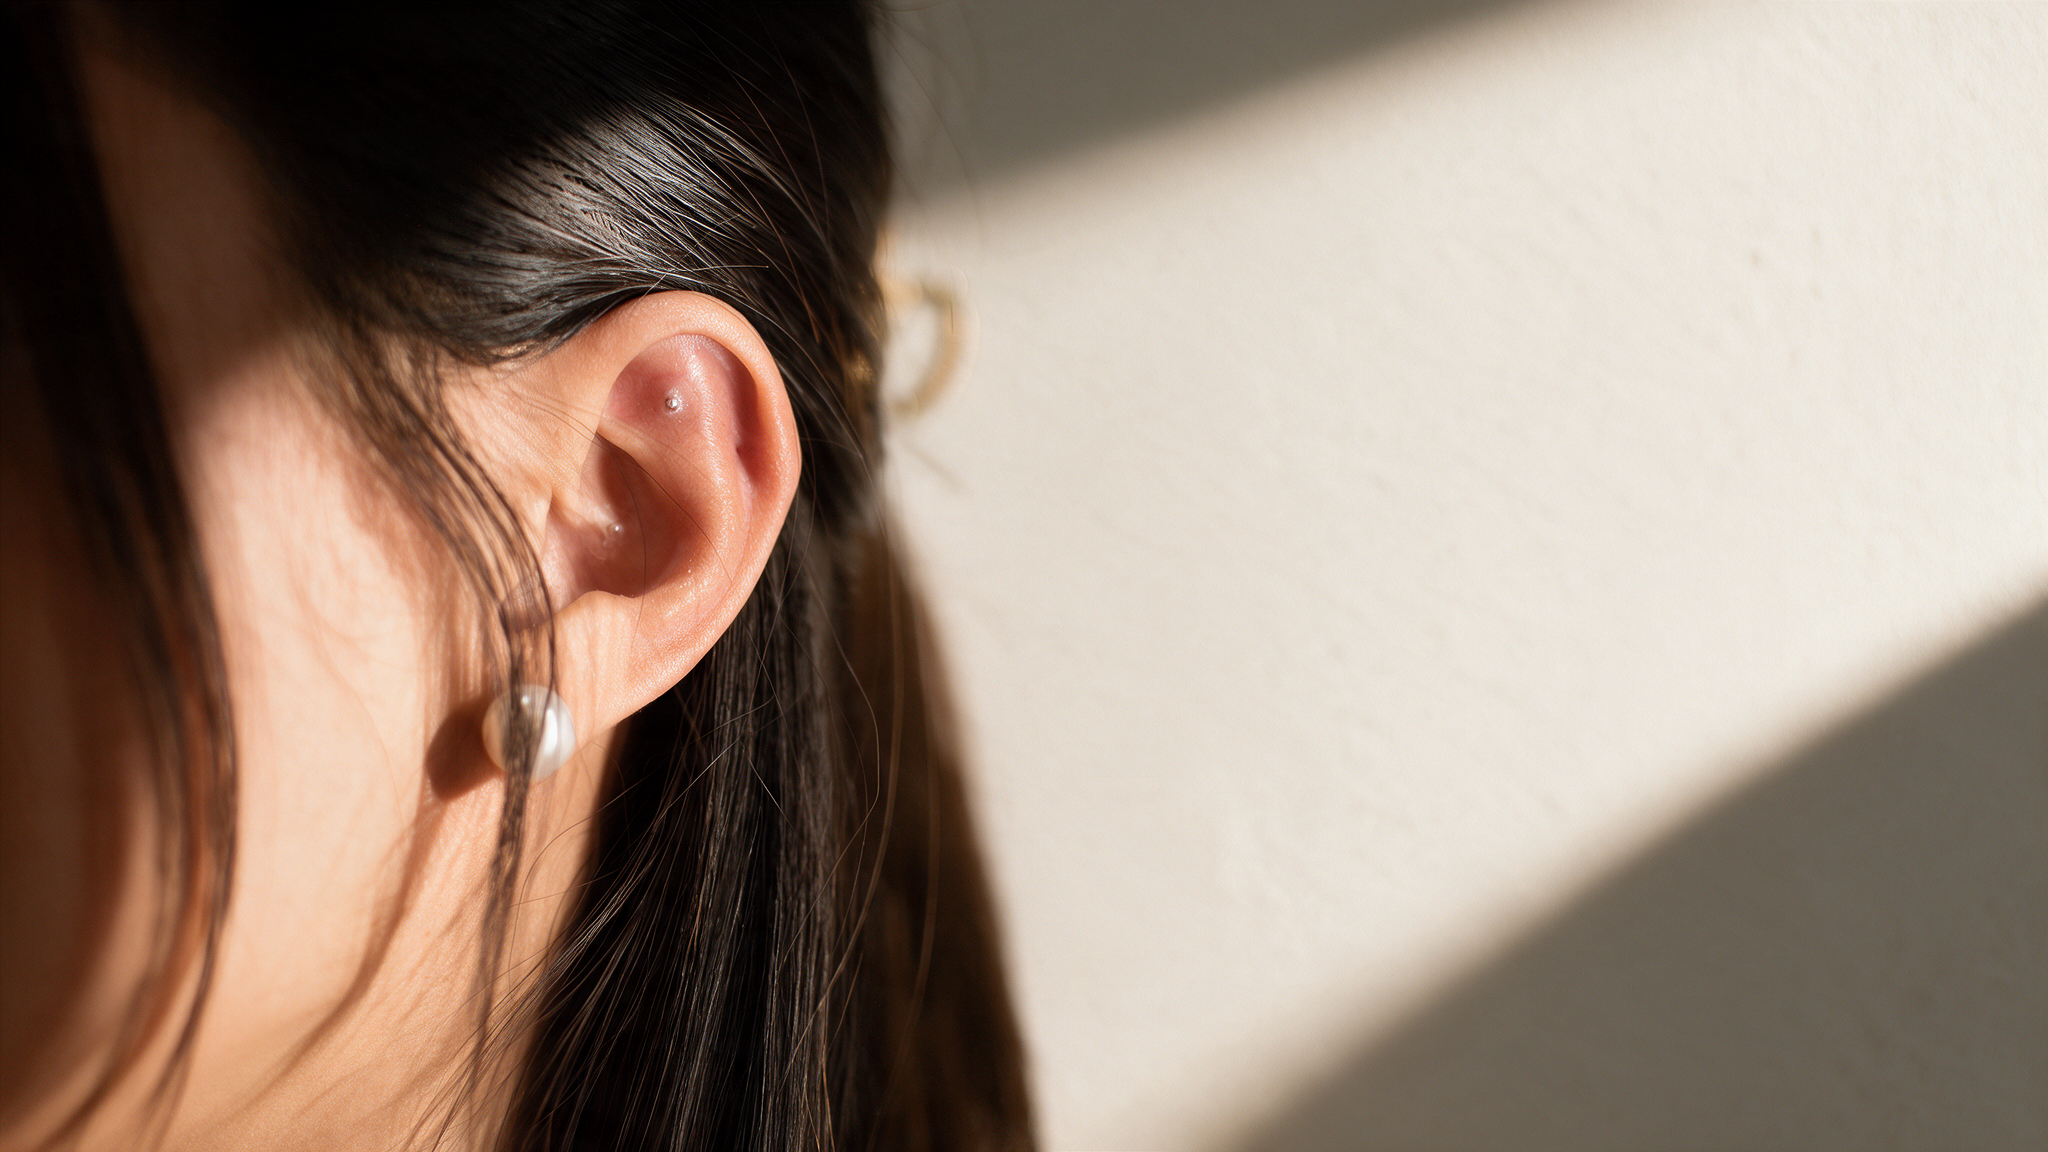
A little preparation helps your ear seeds stay in place.
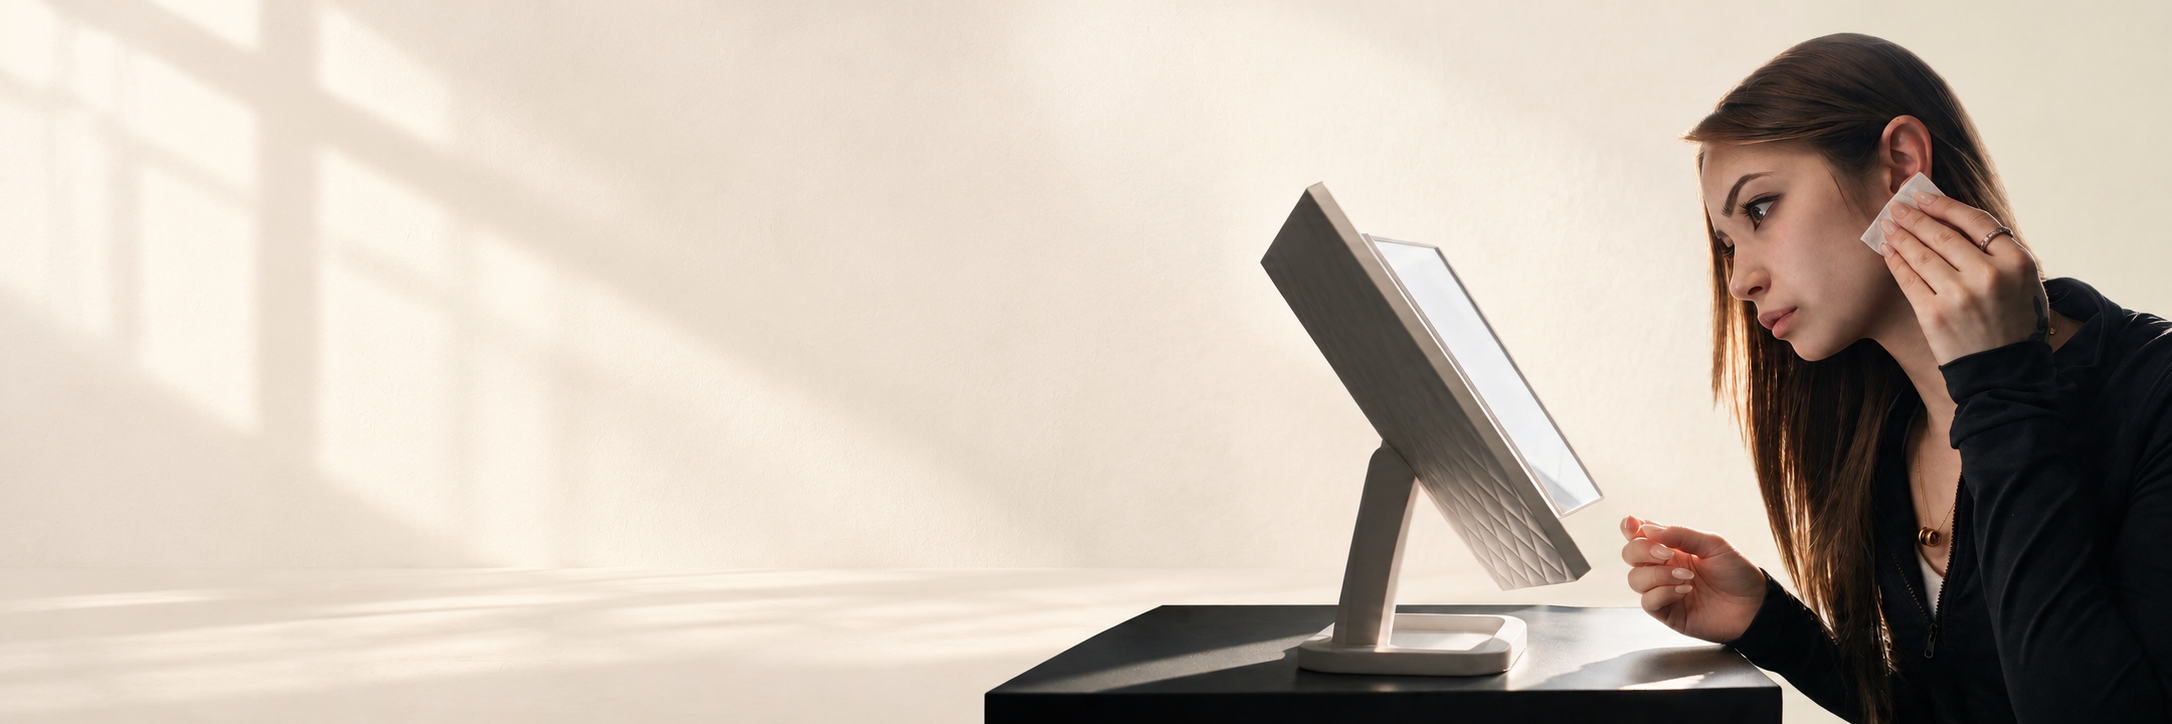
Find a well-lit spot with a mirror, tuck your hair away and have your ear seeds and clean tweezers ready.
Wash and dry your hands, then gently clean your outer ears to remove oils, sweat and skincare residue. If using an alcohol wipe, avoid broken or irritated skin and keep it away from the ear canal.
Let your skin dry completely before applying, and keep the area free from creams and oils.
Before you begin
A few simple preparations to help your ear seeds stay in place.
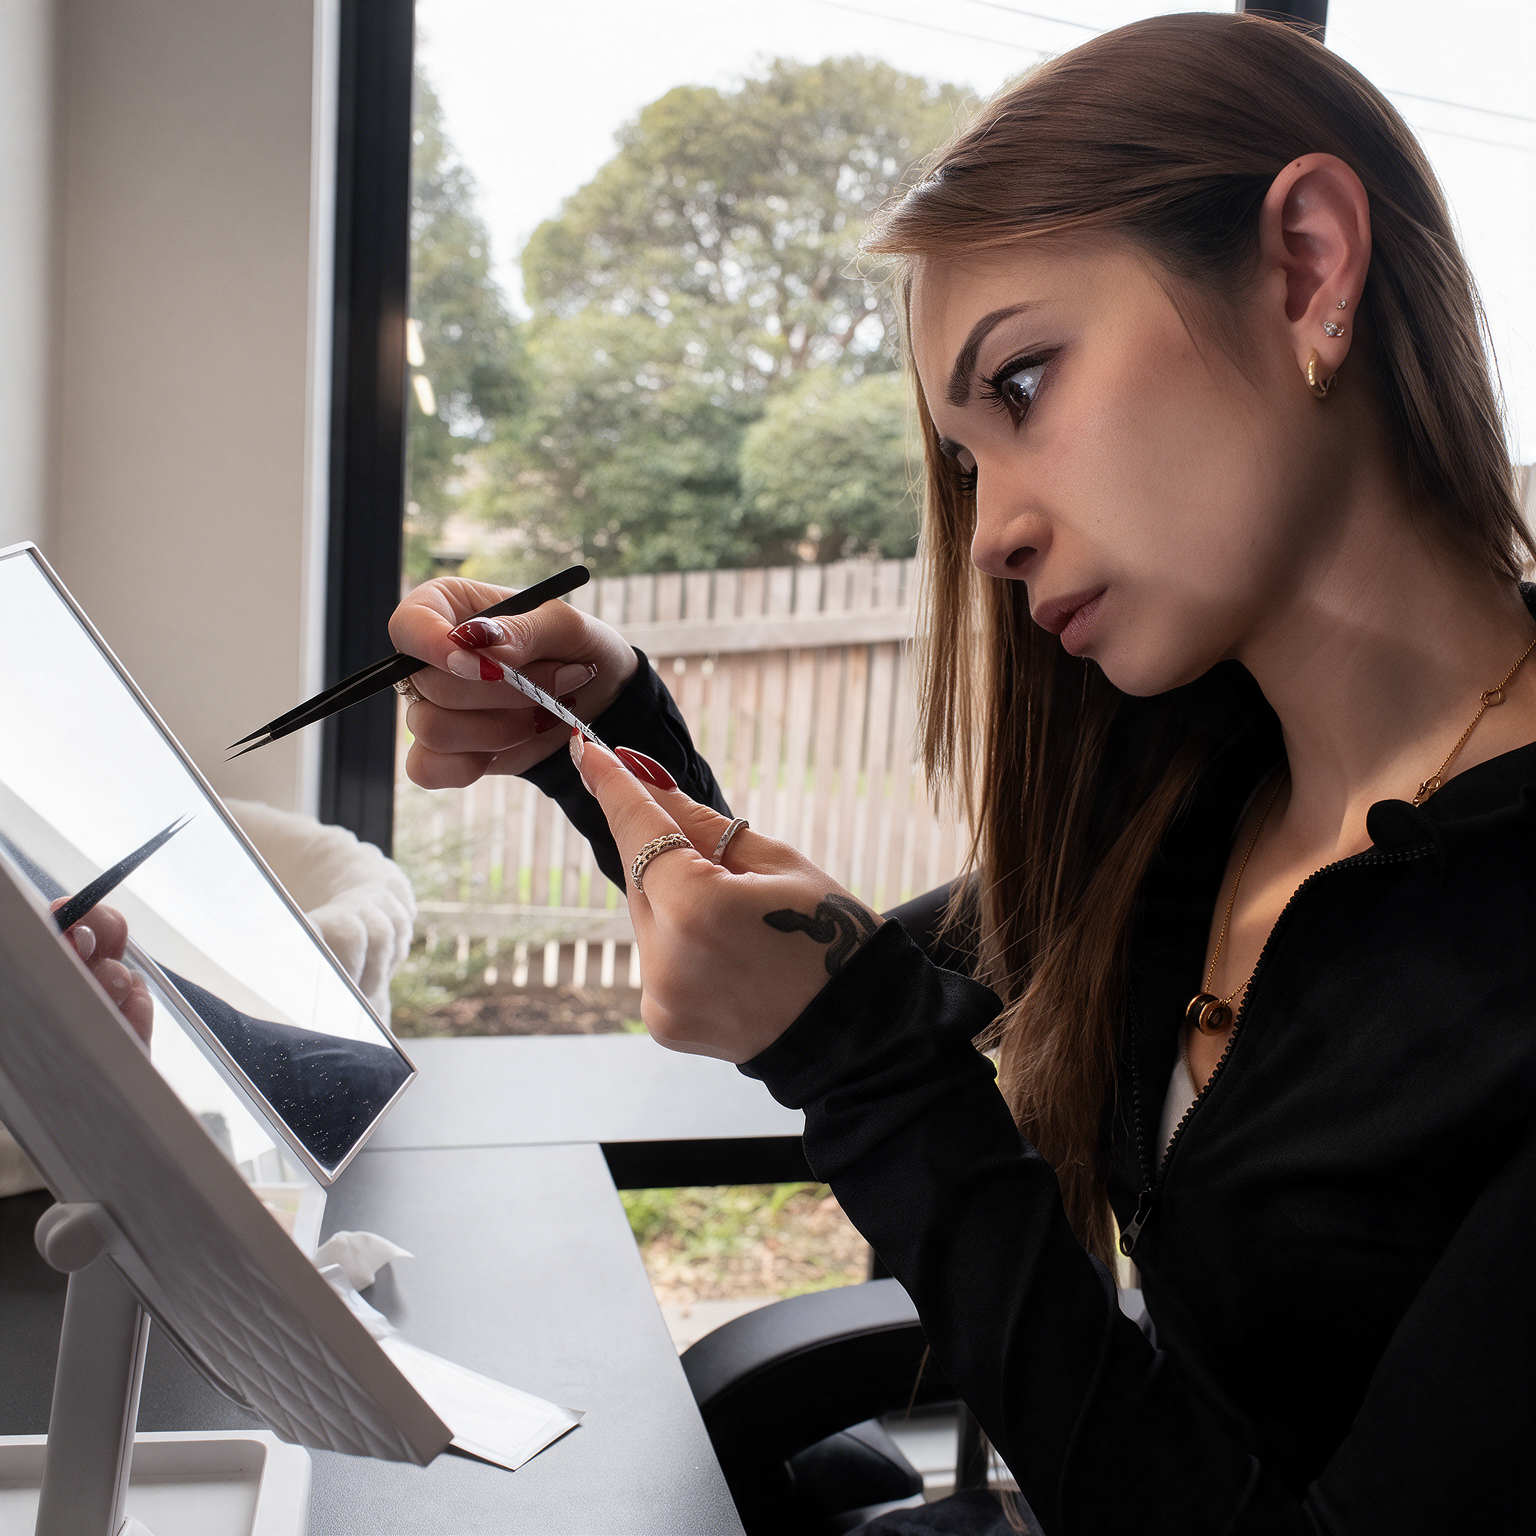
01. Get everything ready
Find a well-lit space and a mirror. Have your Manfa ear seeds, clean tweezers and placement guide within reach, and tuck your hair away from your ears.
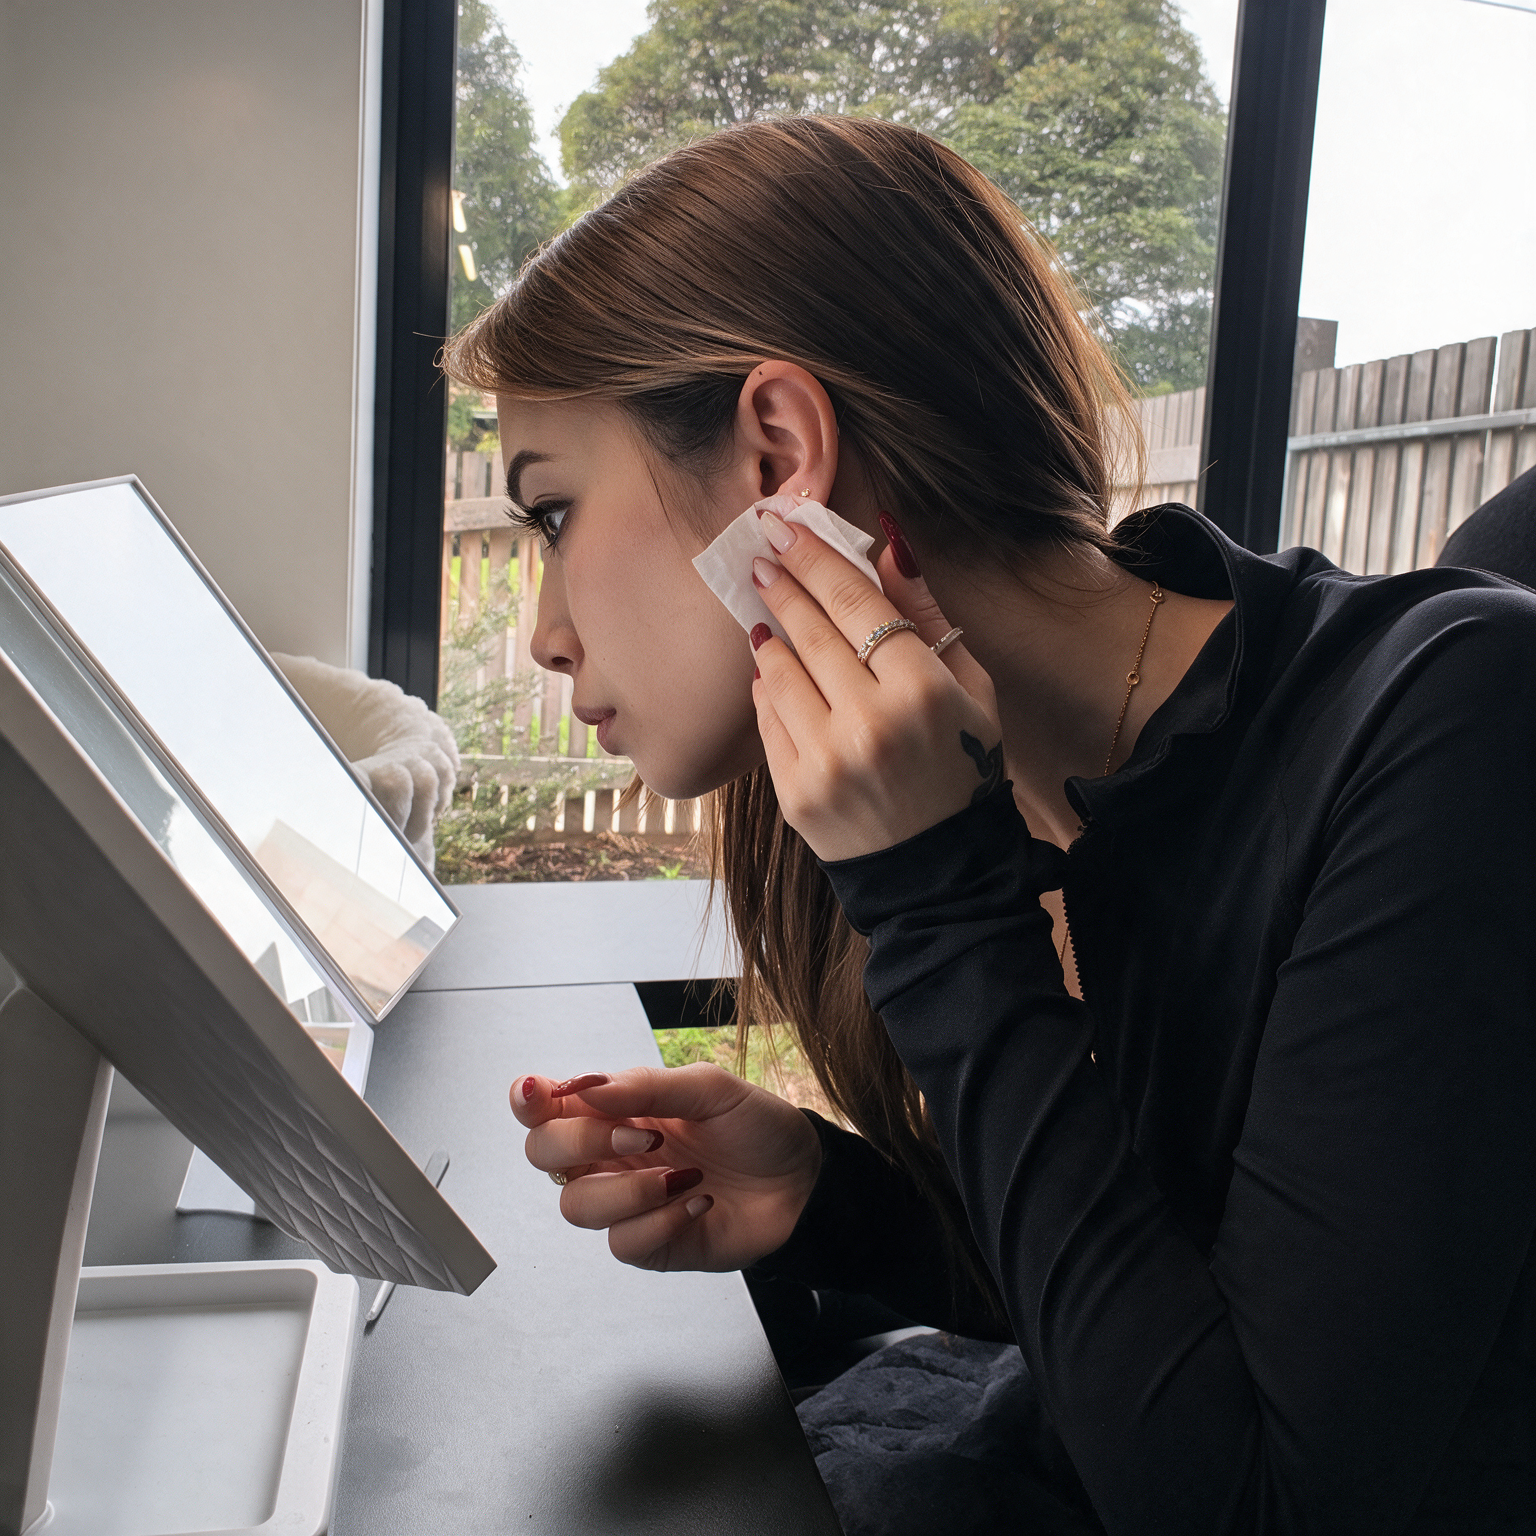
02. Clean your hands & outer ears
Wash and dry your hands.
Gently clean your outer ears to remove oils, sweat and skincare residue. If using an alcohol wipe, use it only on intact outer-ear skin and keep it away from the ear canal.
Allow your skin to dry completely before applying. Avoid applying oils, creams or moisturisers to the area.
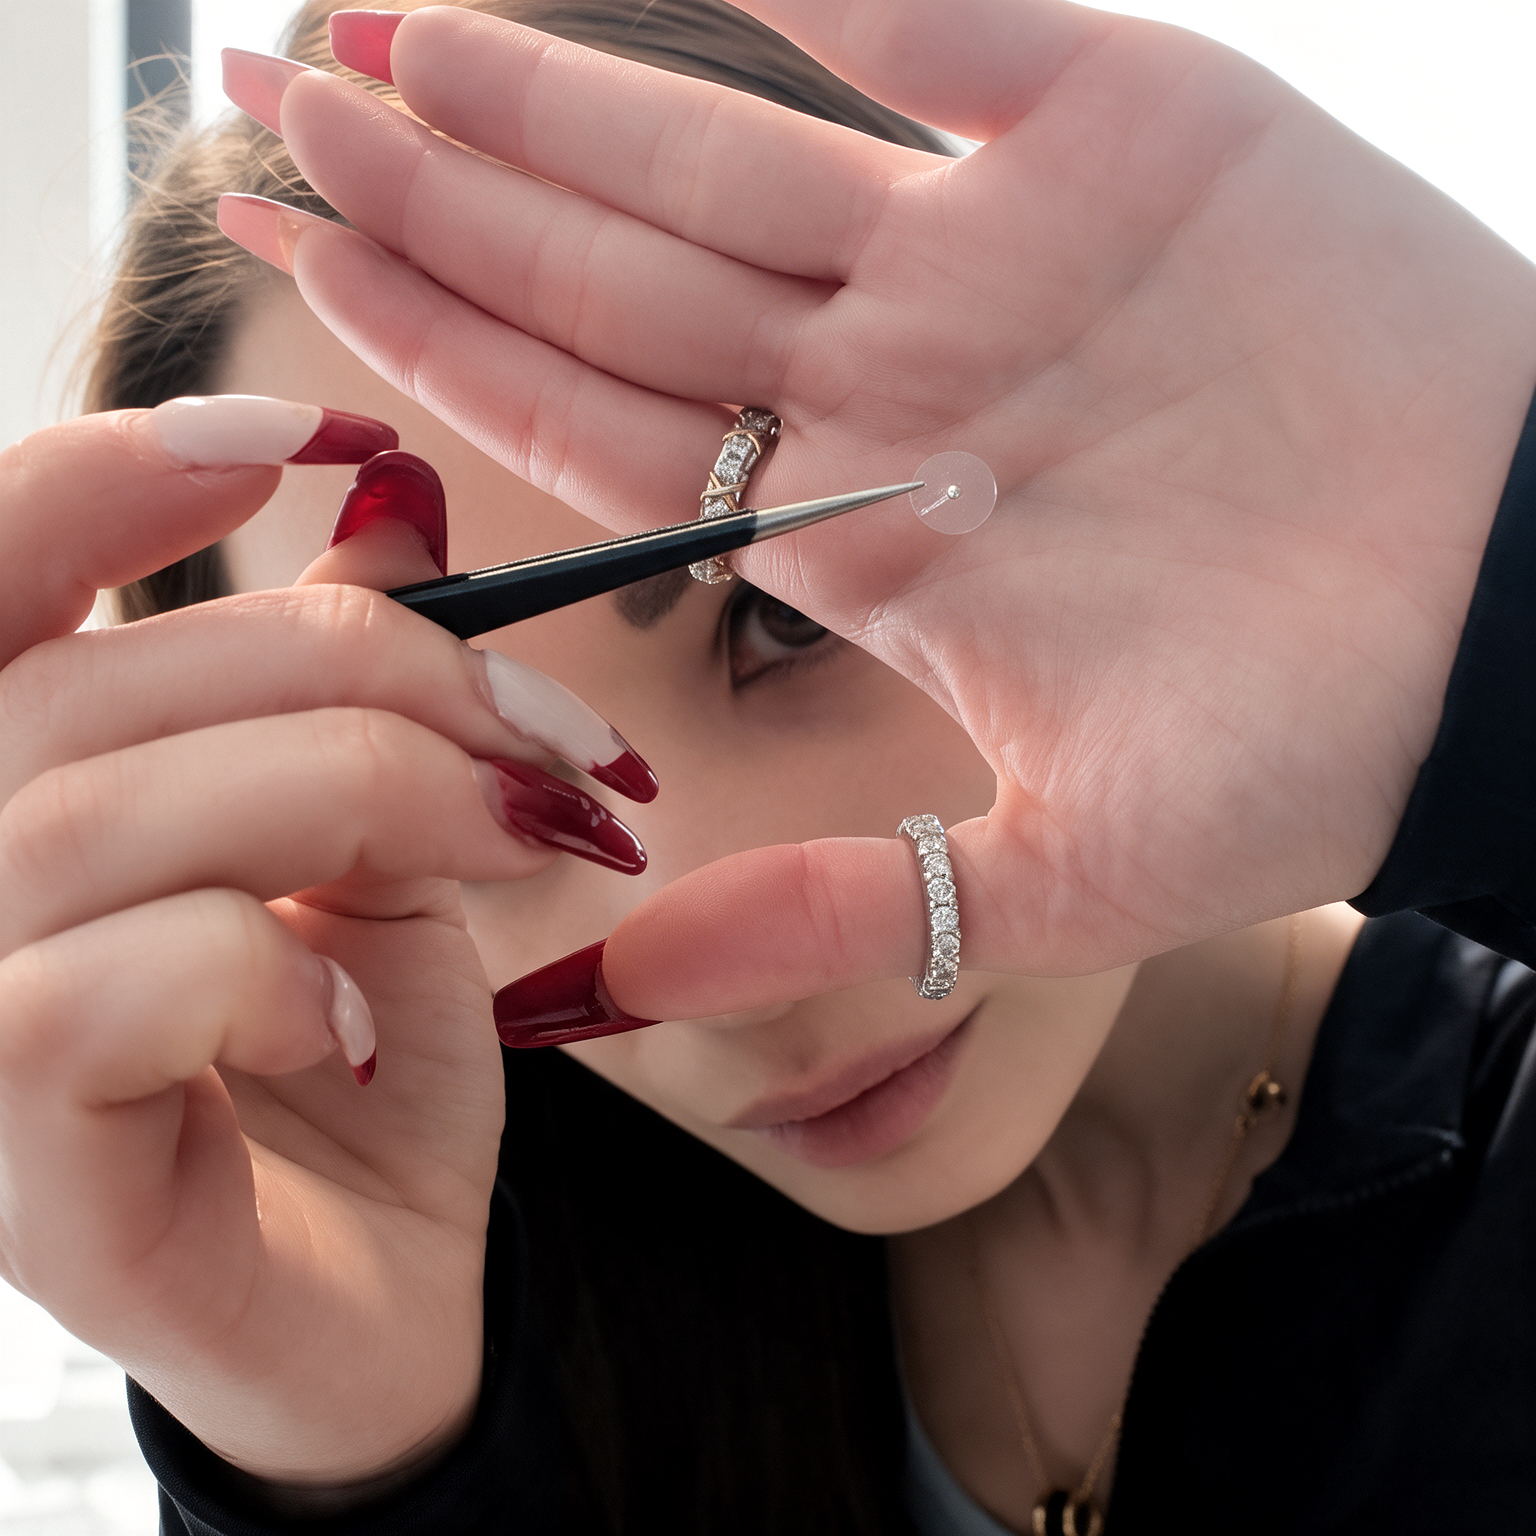
03. Handle with care
Use clean tweezers to lift each ear seed by the edge of its adhesive patch. Avoid touching the sticky underside with your fingers, as oils and moisture can reduce adhesion.
How to apply
A few simple steps to begin your ritual.
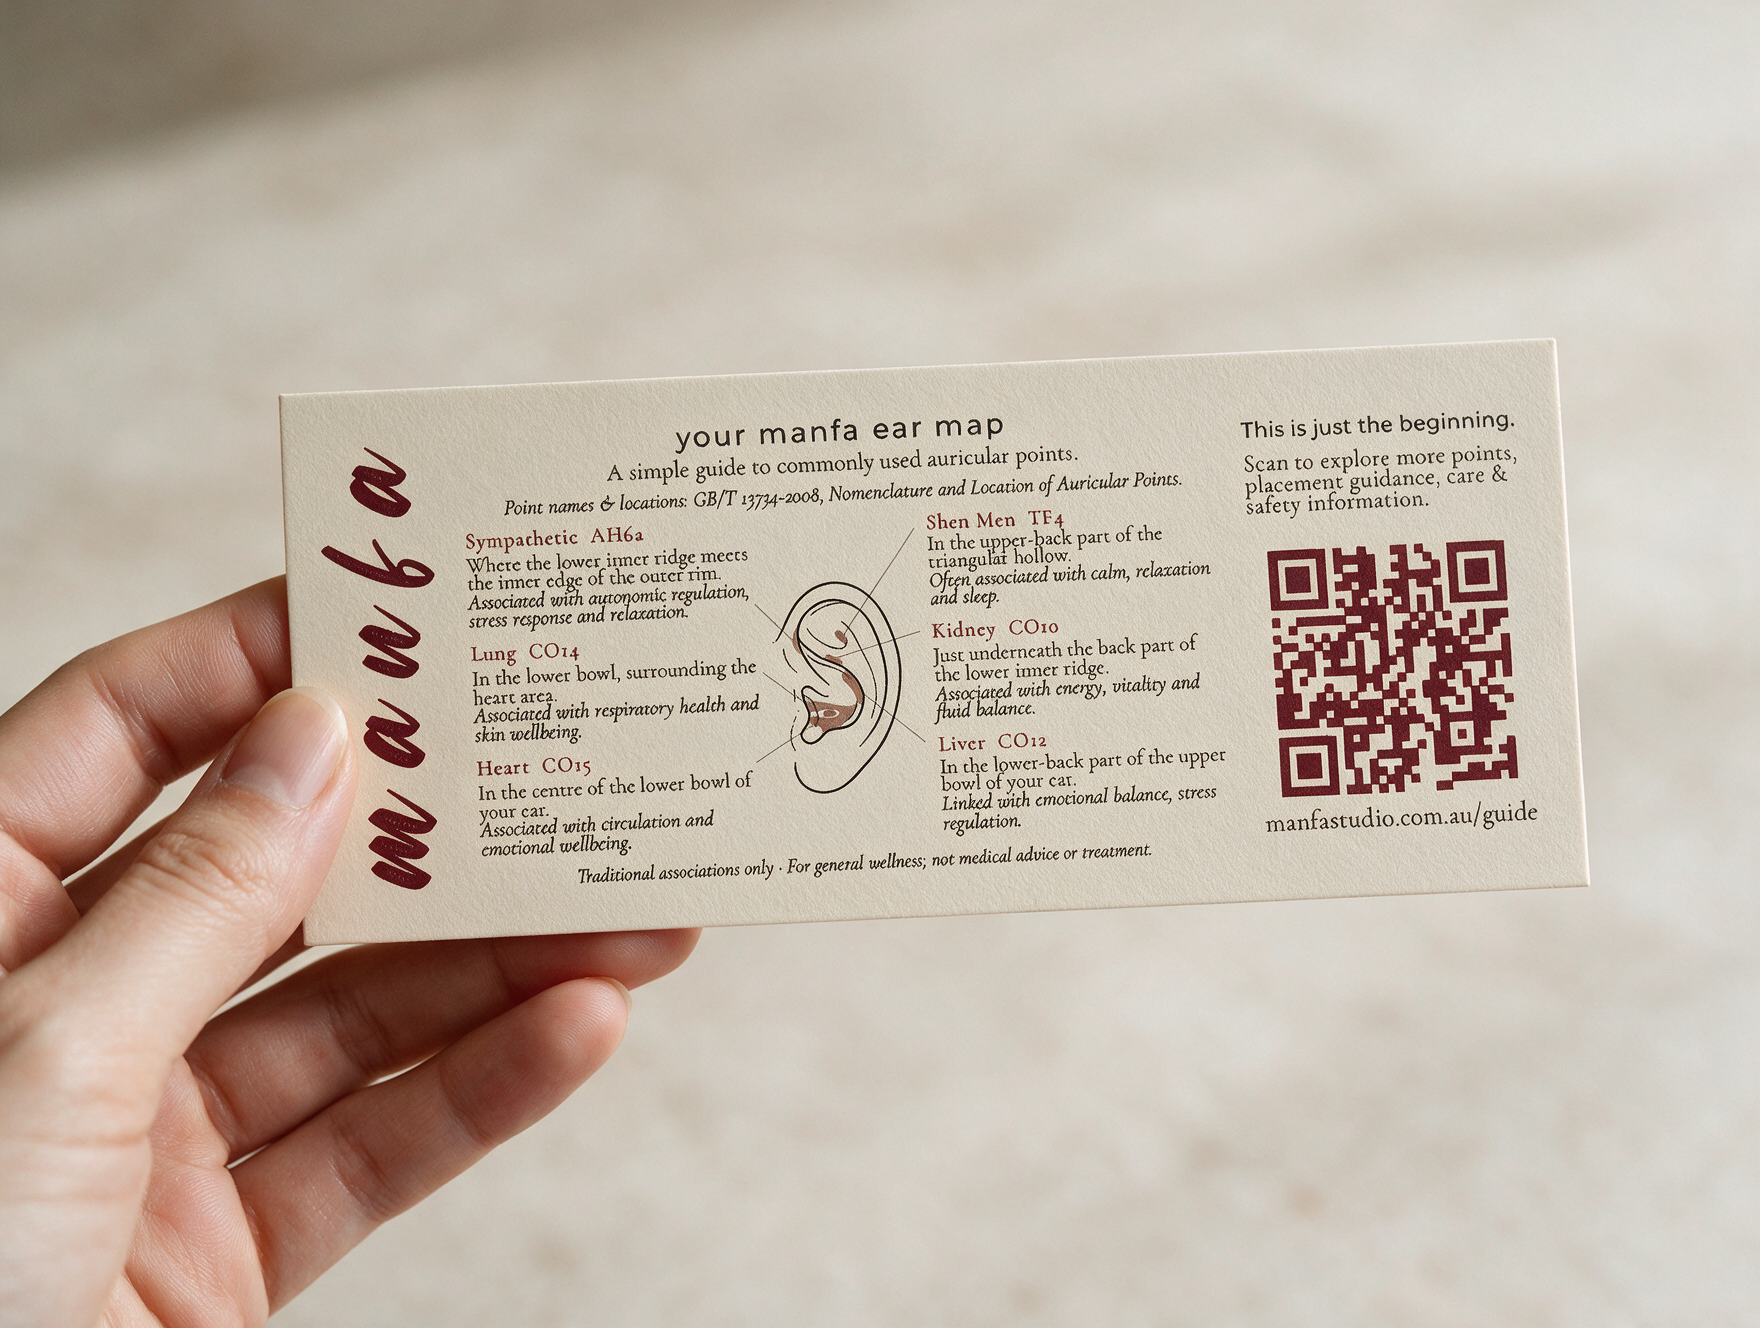
01. Choose your placement
Refer to the placement guide included in your packaging or further down this page.
Choose your point, then use a mirror to locate it on your ear before peeling an ear seed from its backing.
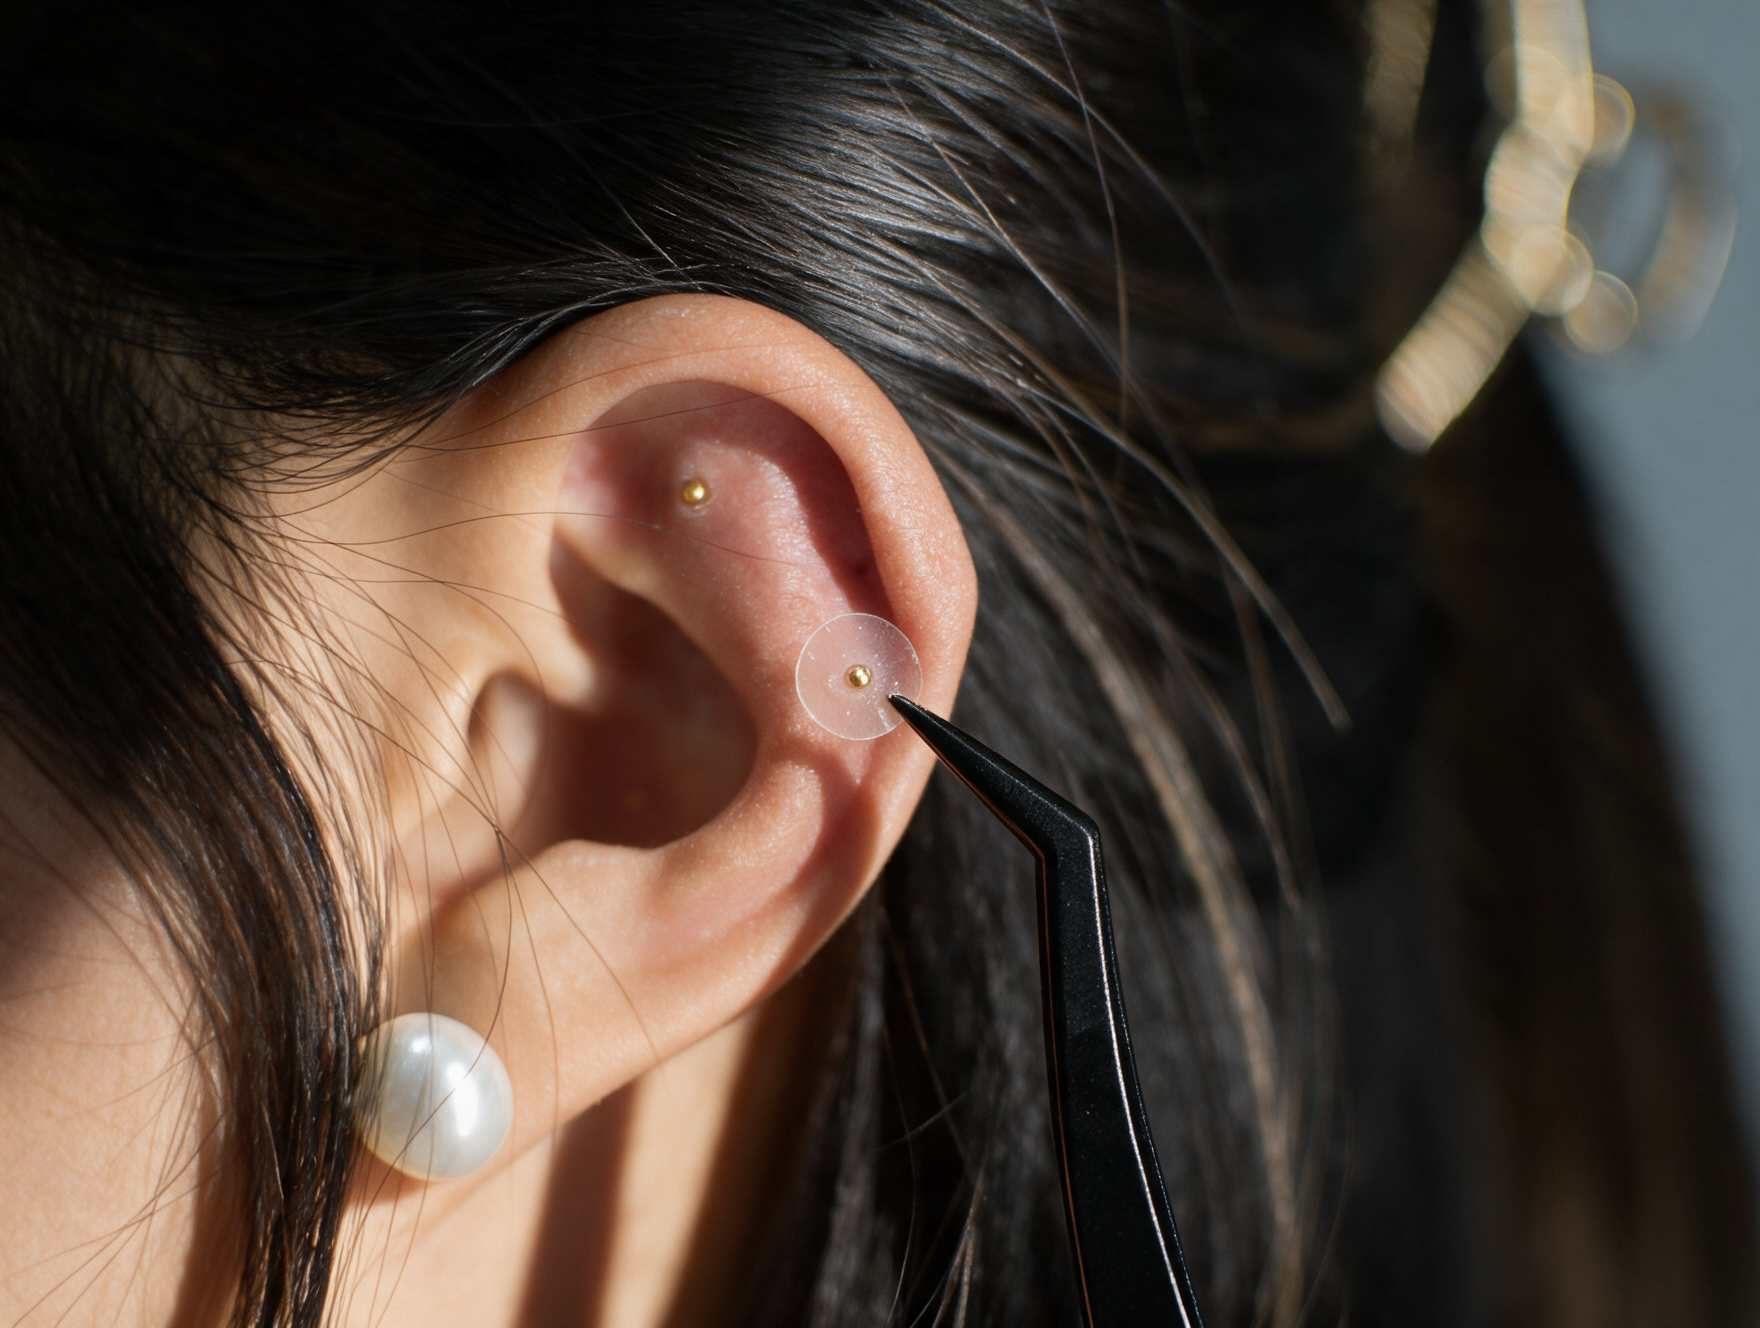
02. Peel & place
Using clean tweezers, carefully lift each patch by its edge. Avoid touching the sticky underside with your fingers, as oils and moisture can reduce its stickiness.
Position the bead over your chosen point, then gently lay the adhesive patch against your skin. Apply one ear seed at a time.
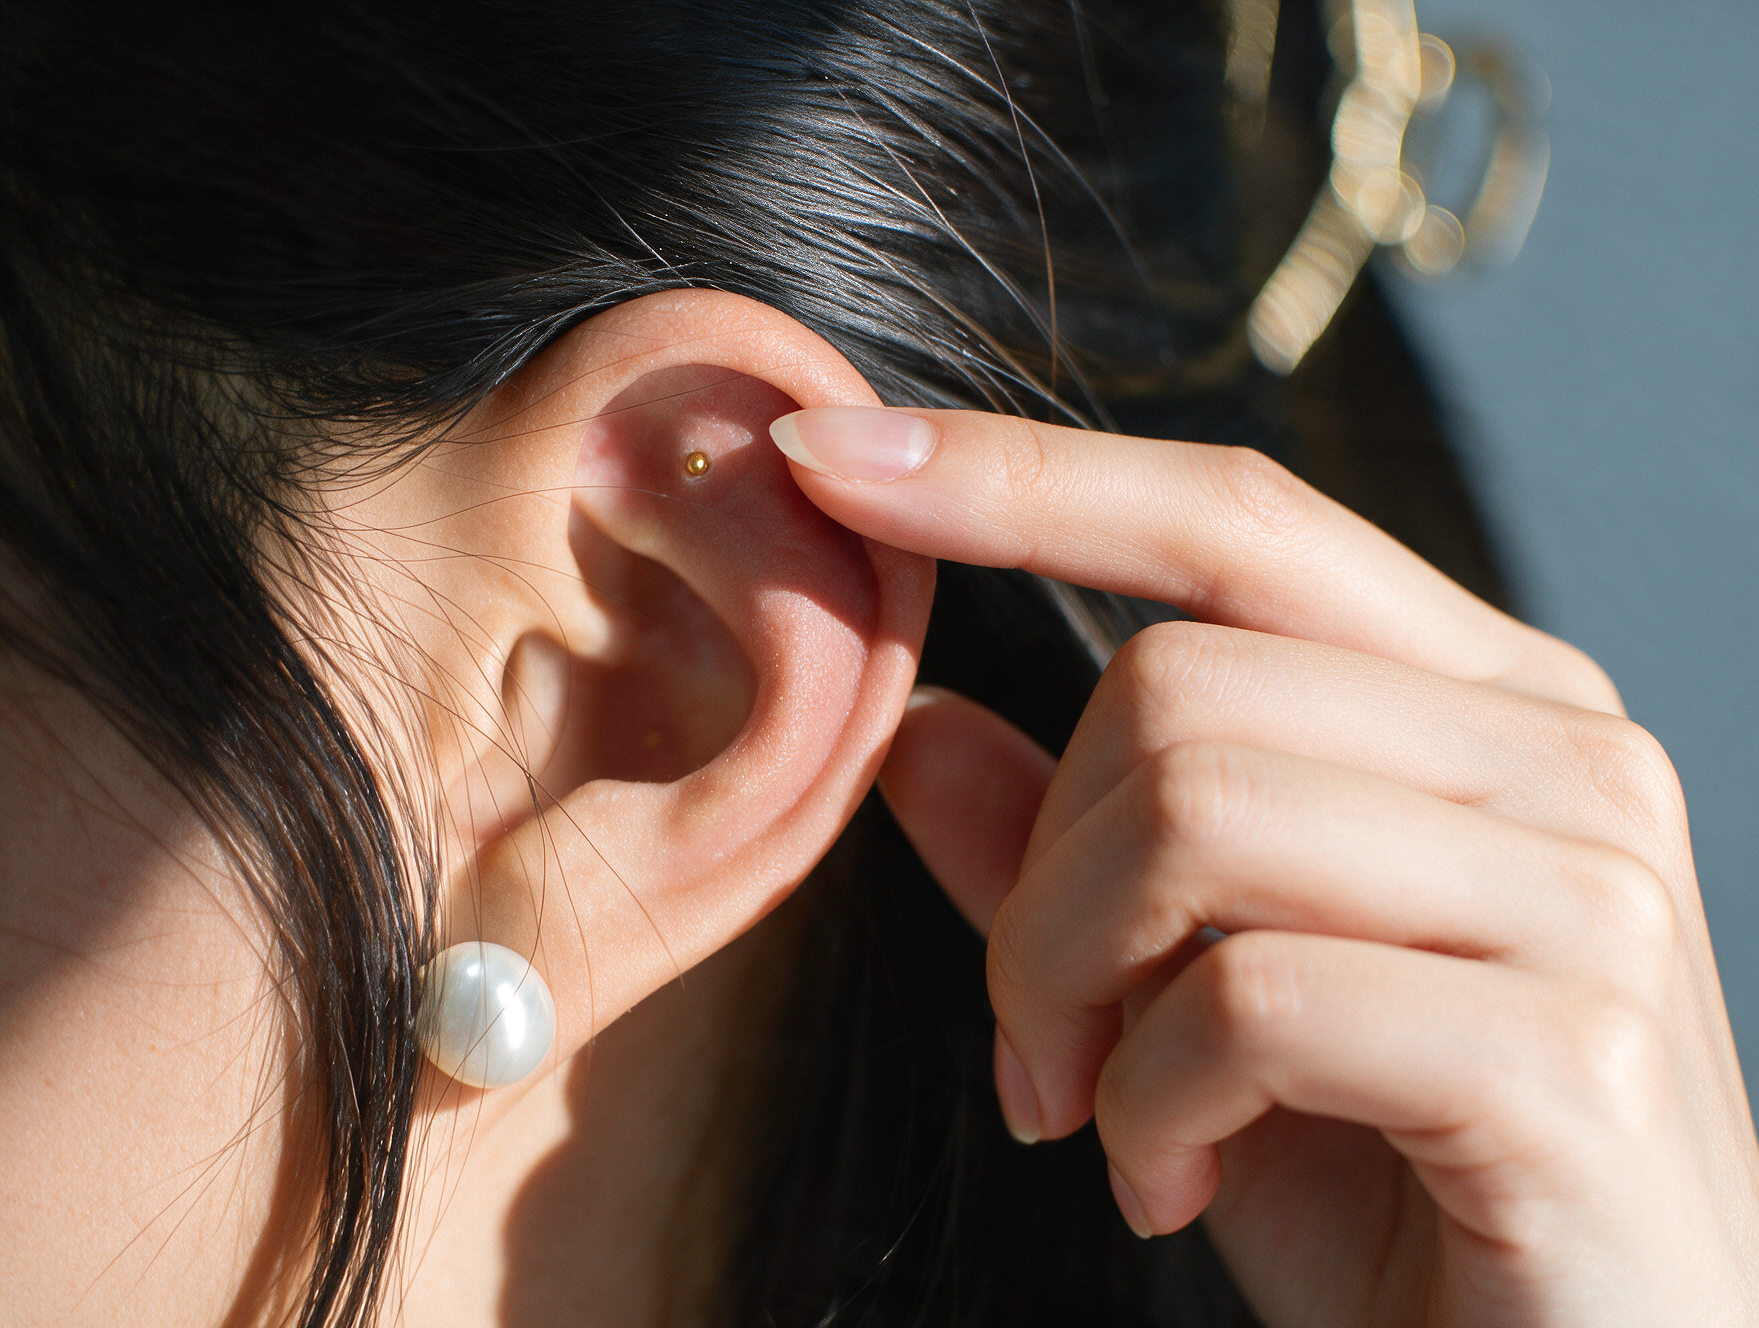
03. Gently secure
Release the patch from the tweezers. With a clean, dry fingertip, gently smooth the adhesive around the bead so the edges sit flat against your skin, without folds.
How to apply
A few simple steps to begin your ritual.
01. Choose your placement
Refer to the placement guide included in your packaging or further down this page.
Choose your point, then use a mirror to locate it on your ear before peeling an ear seed from its backing.
02. Peel & place
Using clean tweezers, carefully lift each patch by its edge. Avoid touching the sticky underside with your fingers, as oils and moisture can reduce its stickiness.
Position the bead over your chosen point, then gently lay the adhesive patch against your skin. Apply one ear seed at a time.
03. Gently secure
Release the patch from the tweezers. With a clean, dry fingertip, gently smooth the adhesive around the bead so the edges sit flat against your skin, without folds.
Explore your ear map
Every ear is a little different. Manfa’s shaded area guides make placement easier to follow, using the shape and folds of your ear as landmarks.
Point names and location descriptions are based on the Chinese national standard GB/T 13734-2008, Nomenclature and Location of Auricular Points. The shading is Manfa’s simplified visual guide for at-home use.
Take your time. Your ear doesn’t need to look exactly like the drawing. The keywords beneath each point describe traditional associations in Chinese medicine, rather than proven effects of ear seeds.
Designed for your everyday ritual, this guide offers a simple starting point. For individual health concerns or personalised support, a qualified practitioner can help.
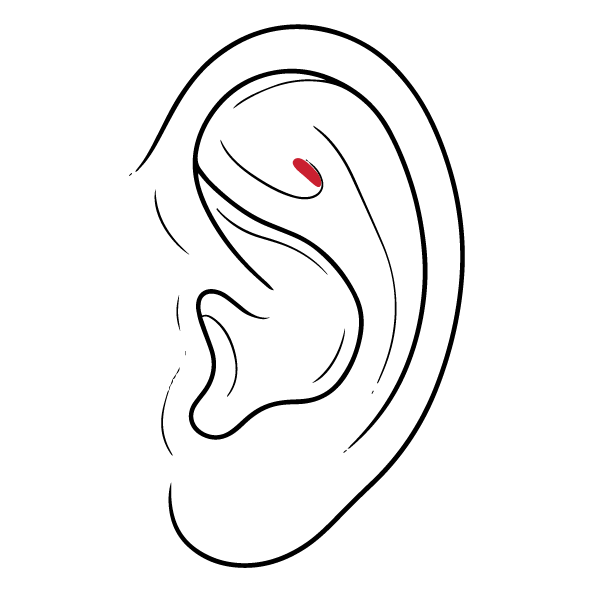
Shen Men · TF4
Calm · Relaxation ·
Settling the mind
Find the triangle-shaped hollow near the top of your ear. Follow the shaded area in its upper back third, just above where the two inner ridges meet.
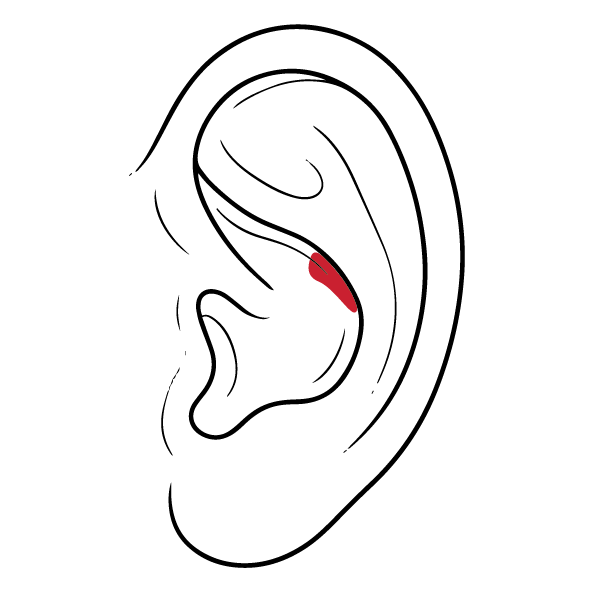
Liver · CO12
Emotional balance ·
Stress regulation
Find the upper bowl of your ear. Follow the shaded area towards its back, lower corner, beside the inner raised ridge.
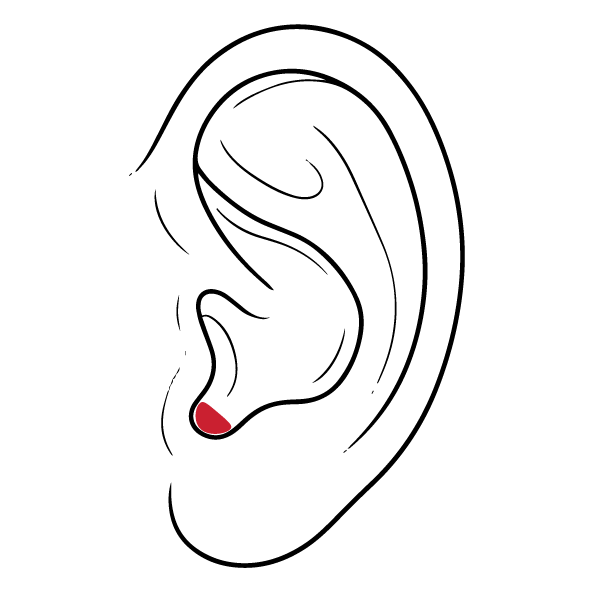
Endocrine · CO18
Hormonal regulation · Menstrual wellbeing
Find the small notch between the two bumps just above your earlobe. Follow the shaded area inside this notch, at the bottom of your ear’s lower bowl.
01
A busy mind
Shen Men · Sympathetic · Subcortex
Make space for a quiet pause when your thoughts feel full.
05
Neck & Shoulders
Neck · Shoulder ·
Shen Men
Pair your ritual with a gentle stretch and a break from your screen.
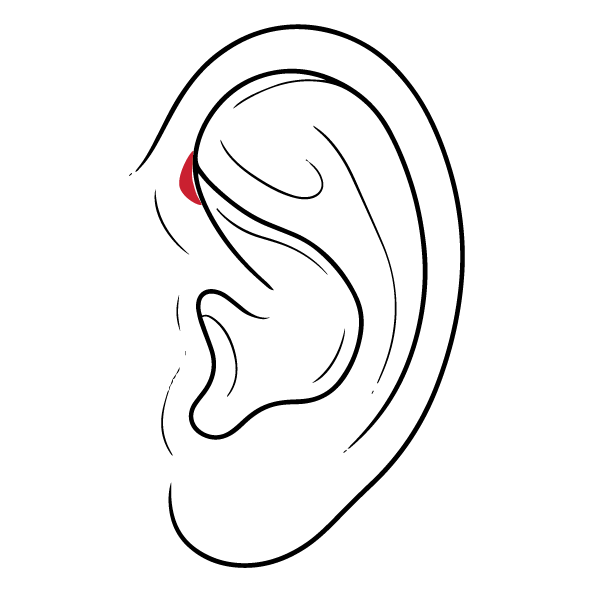
Sympathetic · AH6a
Autonomic balance ·
Stress response · Relaxation
Follow the lower ridge of the triangle-shaped hollow towards your face. At its tip, find the junction tucked beneath the outer rim’s fold. The shading shows where to look.
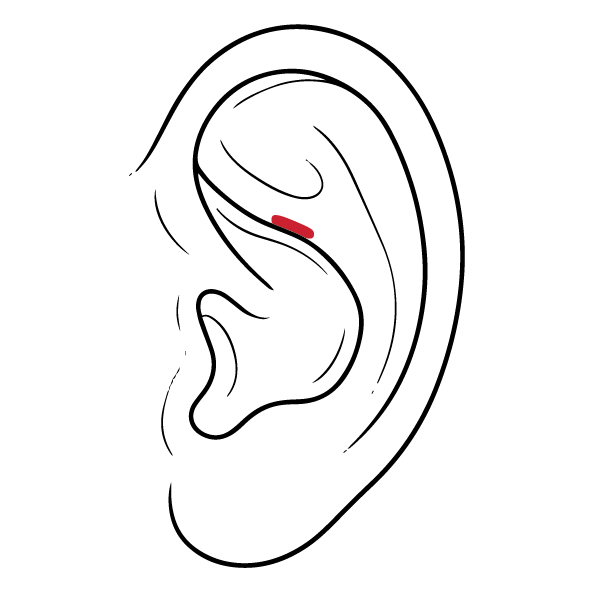
Kidney · CO10
Energy · Vitality · Fluid balance
Find the lower ridge of the triangle-shaped hollow near the top of your ear. Follow it towards the back of your ear, then look just below it in the upper bowl. Follow the shaded area beneath this ridge.
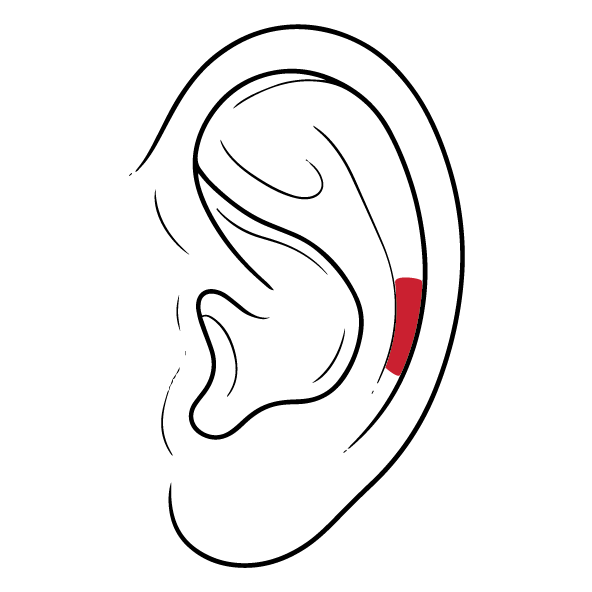
Shoulder · SF4–5
Shoulder comfort ·
Ease of tension
Find the narrow groove between your ear’s outer rim and the raised inner ridge. Follow the shaded area in the lower-middle part of this groove.
Find your ritual
Not sure where to begin? Explore these combinations, inspired by the points’ traditional associations in Chinese medicine. Choose one that feels relevant to your day then use the placement guides above to find each area.
These suggested combinations reflect traditional associations, not proven treatment effects. Ear seeds are an optional wellbeing ritual and do not replace medical care.
03
Emotional wellbeing
Shen Men · Heart · Liver
Take a moment to check in with yourself on emotionally demanding days.
07
Energy & Nourishment
Kidney · Spleen · Stomach
Bring a little intention to your day through traditional themes of energy and nourishment.
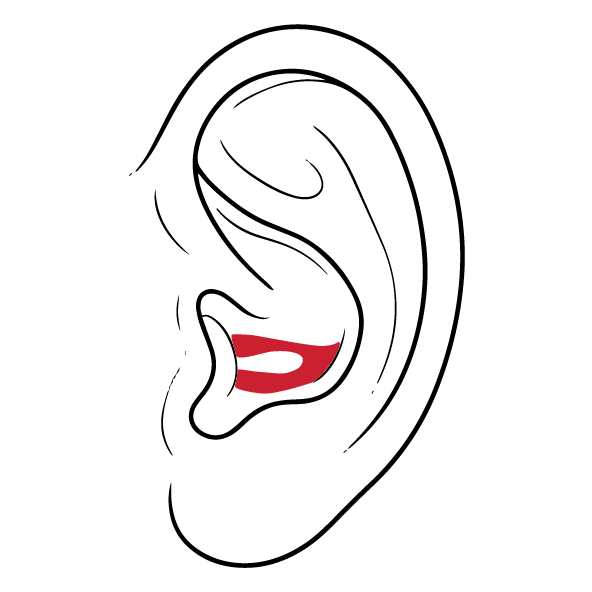
Lung · CO14
Breathing · Skin wellbeing
Find the lower bowl of your ear, just outside the ear canal. Follow the shaded area surrounding the Heart and Trachea regions, leaving the central unshaded area clear.
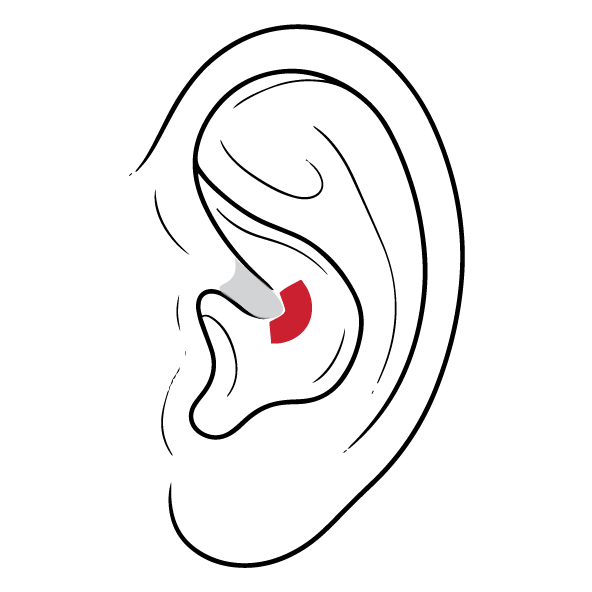
Stomach · CO4
Digestion · Stomach comfort
Find the short ridge shown in pale grey. Follow it away from your face to where it ends, then use the red area around its tip as your placement guide.
Subcortex · AT4
Calm · Rest ·
Settling the mind
Find the small raised bump just above your earlobe, opposite the flap beside your ear canal. The placement is on the inside of this bump, facing into the bowl. The shaded area shows where to look.
04
Digestive wellbeing
Stomach · Spleen · Sympathetic
Explore points traditionally associated with digestion and nourishment.
08
A breathing break
Lung · Shen Men · Sympathetic
Pause, soften your shoulders and take a few slow, comfortable breaths.
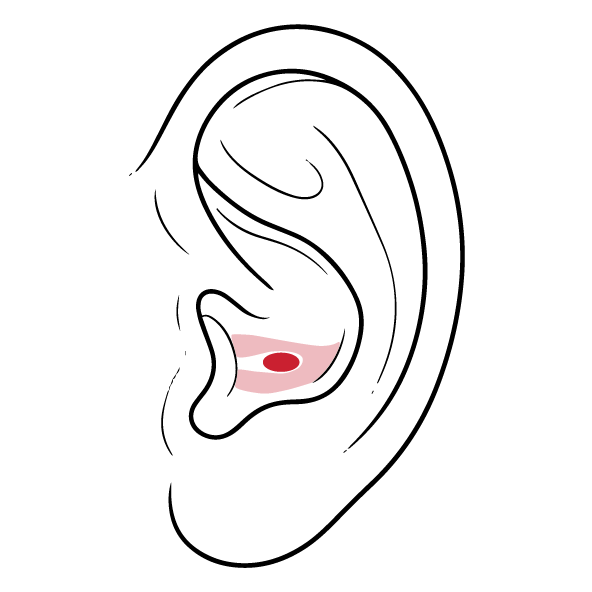
Heart · CO15
Circulation ·
Emotional wellbeing
Find the central hollow in the lower bowl of your ear, just outside the ear canal. Follow the small shaded area in the centre, surrounded by the Lung region.
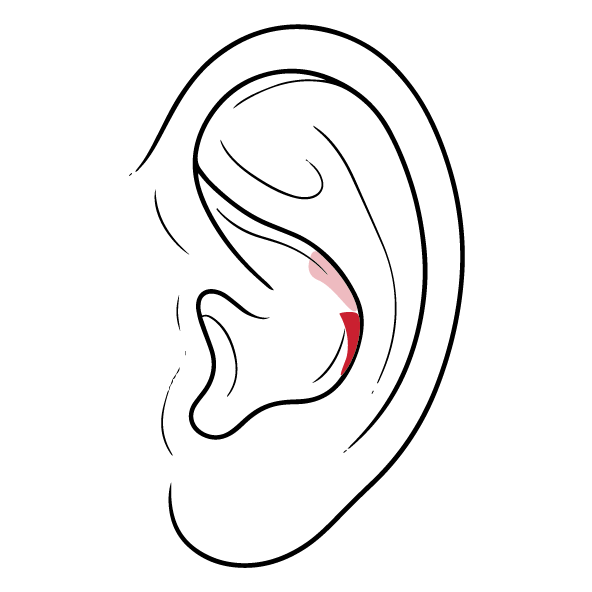
Spleen · CO13
Digestion · Nourishment · Energy
Find the lower bowl of your ear. Follow the dark red area along its upper back edge, beside the inner raised ridge. The pale pink shows the Liver region above for reference.
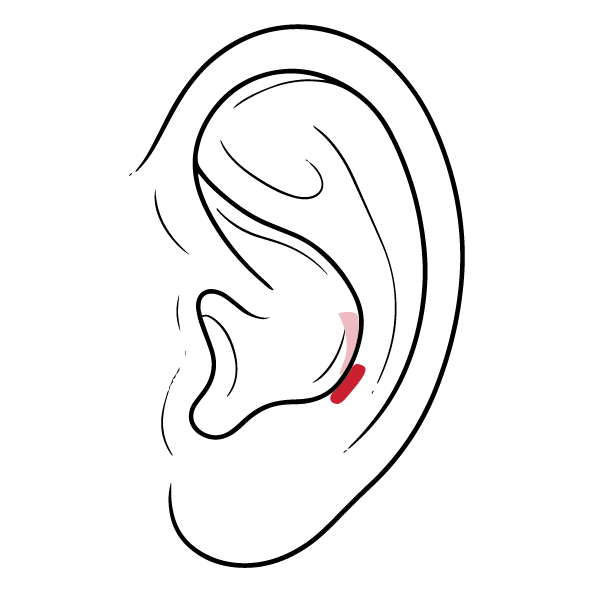
Neck · AH12
Neck comfort ·
Ease of tension
Follow the curved inner ridge down towards your earlobe. Find its lowest section, just before it meets the raised bump. Follow the red area on the side facing into the bowl.
02
Winding down
Shen Men · Heart · Subcortex
An evening ritual to mark the transition from doing to resting.
06
Menstrual wellbeing
Endocrine · Kidney ·
Shen Men
Explore traditional associations with menstrual wellbeing, vitality and calm.
Inquiries, Illuminated
-
Our programs are meticulously curated to harmonize evidence-based practice with artful ritual.
-
Yes; every guide holds accredited credentials and ongoing advanced training.
-
Reserve directly through our online calendar or by calling our concierge.
-
We kindly request notice 24 hours in advance to honor mutual respect.
-
Indeed; our elegantly presented certificates invite loved ones into restorative luxury.
Wear & Care
Your seeds are on. Here’s how to give them a little care.
-
With clean, dry hands, gently press each seed for a few seconds, a few times throughout the day. Make it a moment to pause and take a breath. Keep the pressure comfortable, there’s no need to press hard. Stop if it hurts.
-
Keep creams, oils and hair products away from the patches. If they get wet, gently pat them dry. Try to leave the edges alone. Picking and rubbing can loosen them.
-
Take care when brushing your hair, drying off or pulling clothes over your head. Headphones and earphones shouldn’t press uncomfortably against your seeds. If a seed bothers you while sleeping, take it off.
-
Wear your seeds for up to 3–5 days, checking your skin each day. Remove them by day five, even if they’re still holding on. You can always take them off sooner.
-
If a patch starts lifting, falls off or loses its bead, it’s time to bin it. Don’t stick it back on. The adhesive may no longer hold securely. For a fresh start, clean and dry your skin, then use a new patch.
-
Gently peel each patch away while supporting the skin underneath. Dispose of the patch and bead together, then gently clean the area. Give your skin at least 24 hours before your next application, and longer if it still feels sensitive.
Wear & Care
Your seeds are on. Here’s how to give them a little care.
-
With clean, dry hands, gently press each seed for a few seconds, a few times throughout the day. Make it a moment to pause and take a breath. Keep the pressure comfortable, there’s no need to press hard. Stop if it hurts.
-
Keep creams, oils and hair products away from the patches. If they get wet, gently pat them dry. Try to leave the edges alone. Picking and rubbing can loosen them.
-
Take care when brushing your hair, drying off or pulling clothes over your head. Headphones and earphones shouldn’t press uncomfortably against your seeds. If a seed bothers you while sleeping, take it off.
-
Wear your seeds for up to 3–5 days, checking your skin each day. Remove them by day five, even if they’re still holding on. You can always take them off sooner.
-
If a patch starts lifting, falls off or loses its bead, it’s time to bin it. Don’t stick it back on. The adhesive may no longer hold securely. For a fresh start, clean and dry your skin, then use a new patch.
-
Gently peel each patch away while supporting the skin underneath. Dispose of the patch and bead together, then gently clean the area. Give your skin at least 24 hours before your next application, and longer if it still feels sensitive.
A little housekeeping
A few things worth knowing before you settle into your ritual.
-
Pregnant or think you might be? Skip self-application and speak with your maternity care provider before using ear seeds. If you have a medical condition, are receiving treatment or aren’t sure whether they’re suitable for you, check with your healthcare professional first.
-
Apply only to healthy skin on your outer ear, avoiding cuts, irritated areas and healing piercings. Check the ingredients and materials if you have a known adhesive or metal allergy.
-
Itching, redness, swelling or pain? Gently remove the patch straight away. There’s no need to push through discomfort. Pain doesn’t mean the seeds are working. If symptoms persist or worsen, seek medical advice.
-
If a seed slips into your ear canal, leave the removal to a doctor. Don’t reach in with fingers, tweezers or cotton buds, or try to flush it out, you could push it further in or injure your ear. Contact a doctor promptly, and seek urgent care for pain, bleeding, dizziness or changes in hearing.
-
Store unused seeds securely and put used patches straight in the bin. Keep patches and loose beads away from children and pets.
A little housekeeping
A few things worth knowing before you settle into your ritual.
-
Pregnant or think you might be? Skip self-application and speak with your maternity care provider before using ear seeds. If you have a medical condition, are receiving treatment or aren’t sure whether they’re suitable for you, check with your healthcare professional first.
-
Apply only to healthy skin on your outer ear, avoiding cuts, irritated areas and healing piercings. Check the ingredients and materials if you have a known adhesive or metal allergy.
-
Itching, redness, swelling or pain? Gently remove the patch straight away. There’s no need to push through discomfort. Pain doesn’t mean the seeds are working. If symptoms persist or worsen, seek medical advice.
-
If a seed slips into your ear canal, leave the removal to a doctor. Don’t reach in with fingers, tweezers or cotton buds, or try to flush it out, you could push it further in or injure your ear. Contact a doctor promptly, and seek urgent care for pain, bleeding, dizziness or changes in hearing.
-
Store unused seeds securely and put used patches straight in the bin. Keep patches and loose beads away from children and pets.
A few little questions
-
Either is fine. Start with whichever feels easiest and most comfortable. If you use both ears, you don’t need a perfectly matching set.
-
No need to go all out. Pick one suggested combination or a few points you’d like to explore. Keep your first ritual simple. You can get familiar with the other areas over time.
-
Water, sweat and steam can loosen the patches. Be gentle when washing, skip the scrubbing and pat them dry afterwards. If a patch starts lifting, it’s time to take it off.
-
Every ear has its own shape. Look for the folds and ridges described in the guide, then use the shading to get your bearings. A patch should sit comfortably against your skin, never force it into a tight spot.
-
There’s no special sensation to chase. You might feel a little pressure when gently pressing a seed, but pain, itching or irritation means it’s time to remove it. More sensation doesn’t mean better results.
A few little questions
-
Either is fine. Start with whichever feels easiest and most comfortable. If you use both ears, you don’t need a perfectly matching set.
-
No need to go all out. Pick one suggested combination or a few points you’d like to explore. Keep your first ritual simple. You can get familiar with the other areas over time.
-
Water, sweat and steam can loosen the patches. Be gentle when washing, skip the scrubbing and pat them dry afterwards. If a patch starts lifting, it’s time to take it off.
-
Every ear has its own shape. Look for the folds and ridges described in the guide, then use the shading to get your bearings. A patch should sit comfortably against your skin, never force it into a tight spot.
-
There’s no special sensation to chase. You might feel a little pressure when gently pressing a seed, but pain, itching or irritation means it’s time to remove it. More sensation doesn’t mean better results.
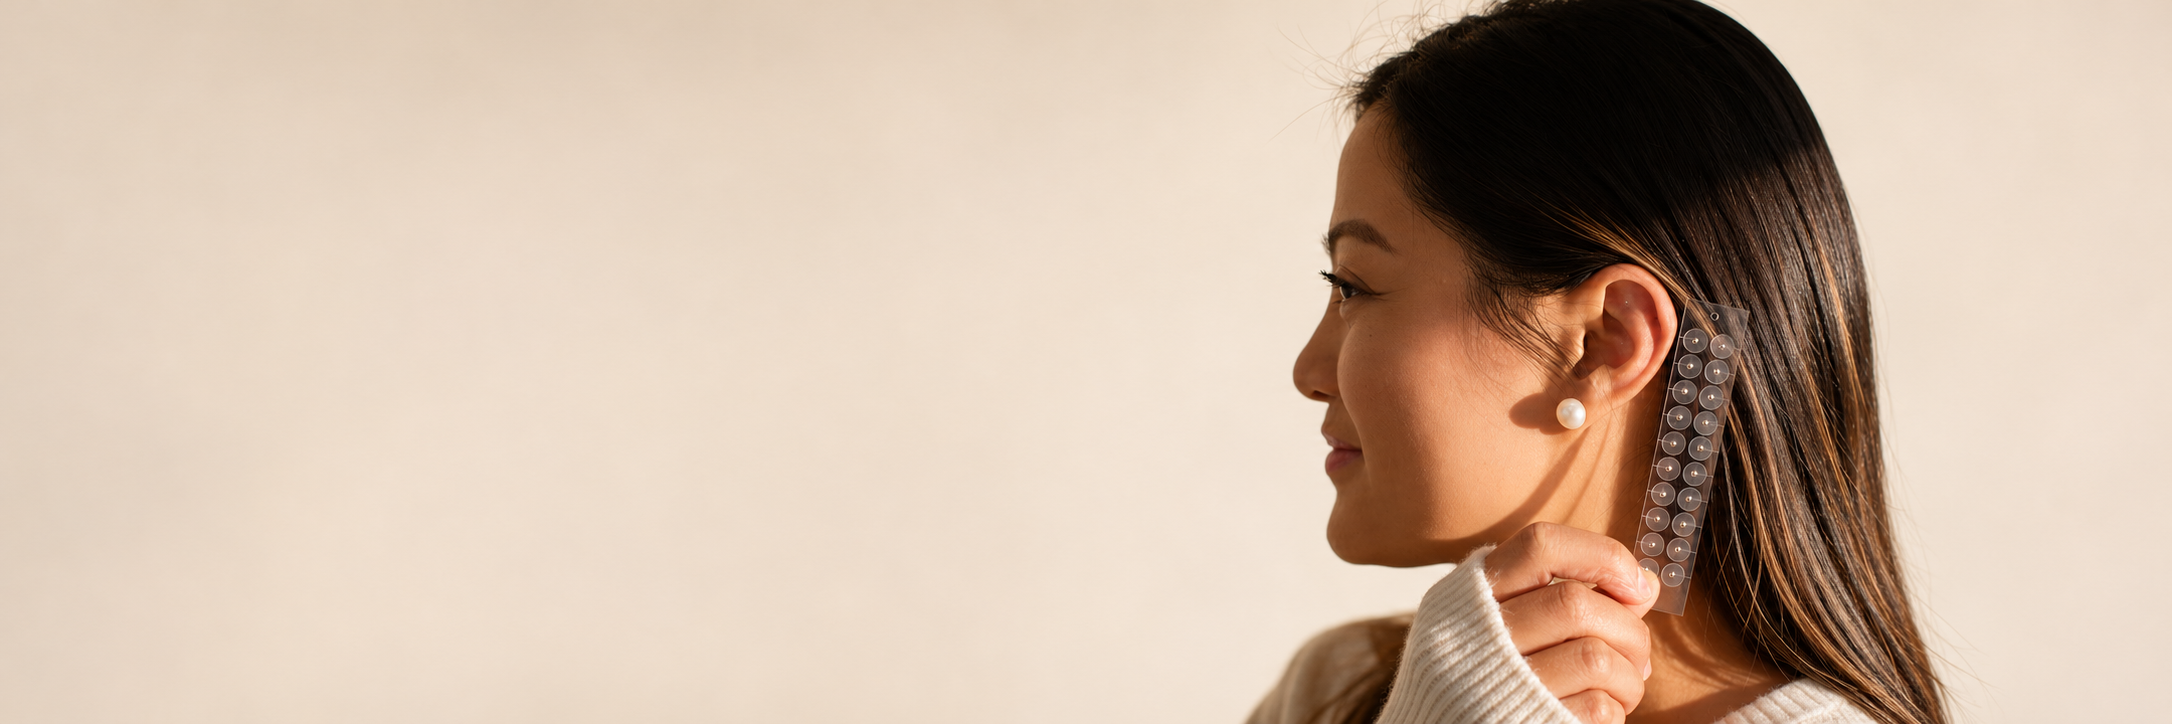
You’re ready. Make it your ritual.
A few tiny seeds, a little intention, and a moment just for you.
Start small, take your time, and enjoy the pause.
Still have questions? Say Hello!